I'm not going to explain why this game console is such a outstanding performer with odd quirks and design choices. But I will throw my own opinions and findings here.
The removable power supply is a neat alternative to way to common solution that relies on a (long) cable to carry the low voltage with the potential to develop wire breaks and has increased impedance on top of that. It's also quite rare for a game console to have an external power supply that outputs multiple voltages.
The N64 uses 3,3V directly without any internal regulation to run all the logic and controllers, the 12V is used in this case because the 3,3V is quite noisy during normal operation (software is running normally) and trust me: You can't cleanup all the ripple on 3,3V by attaching a huge capacitor to it.
That's why there's the 12V rail, it powers the audio amplifier directly which not only takes the audio from the DAC but also from the cartridge slot in the same manner as the SNES did.
The 12V also goes to a SMD 78M05 regulator to output clean 5V which is only used for the Video DAC.
And at last the 12V also goes to the cartridge slot, common use case is mostly for devstuff like the Wideboy (for playing Gameboy carts on the N64).
Always pay attention to 12V rail when tinkering or modding, shorting that to a lower voltage signal will cause permanent damage. Also the same applies to the cartridges as well.
As for the current draw: 12V is can be between 200-230mA depending on video signal. The 3,3V is about 1,16A on no cart and between 1,0-1,4A on original cartridges.
Strangely the N64 consumes less power on the Chameleon Twist title screen (1,05A) as with no cartridge inserted.
It is a commonly accepted fact that this system needs either a "Jumper Pak" (In Japan it has the correct name: Terminator Pak) or Expansion Pak to work properly due to the fact that the used RamBus technology requires termination on it's bus but what If I told you that the real reason is simply a clever design precaution:
The 250Mhz clock has first to be passed through the installed pak to reach the RCP, without anything plugged into the memory expansion slot there won't be any clock for the CPU.
I'm pretty sure that this can be (ab)used for overclocking the entire system without opening the console itself.
The video output of N64 is notorious for being just plain weird. The RCP digitally outputs 21-bit RGB but the stock DAC only converts that into CVBS and Y/C. This idiotic choice might correlate to the tiny texture cache or maybe the imperfect rendered edges that some polygons have (I sometimes see that the HUD on SM64 jitters a little). But who knows what they were thinking at the time.
Back then in 2012 when I bought my N64 and didn't wanted to deal with this subpar video output.
I decided to order some XC9572XL CPLDs to replicate the RGB DAC that Tim Worthington has made with a XC9536XL (FYI, he started to sell the N64RGB kit a few years later).
It was a total failure, the CPLD only outputted red channel on the green outputs and with some changes it got worse with sync signals on the red output and the green channel ended up in the green and blue outputs.
That was first experience with programmable logic.
So I changed my plans and came up with something that uses technology I was very familiar with: Discrete Logic circuits with the 7400 series.
The digital RGB output from the RCP is way too fast for the common 74HC parts to work with.
But there's the 74VHC and 74LVX logic families specified to work with signals in the hundreds of MHz range.
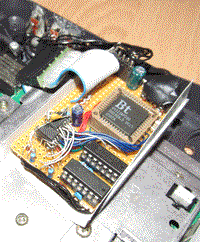 |
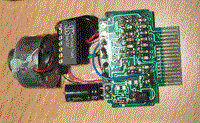
And here I build it. Using several 74VHC574 as latch and a shift register, 74LVX04 as VI_Clock buffer and inverter and well to drive the latches for the actual RGB outputs. The first version was a messy nest of long loose wires and running hi-speed clock signals through that madness required some termination. Around 150ohms on the /DSYNC was enough to prevent that mess from malfunctioning due to the signal bouncing back and forth after an half hour. For the analogue output a R2R DAC was used.
I used that crappy mess till 2023. I've seen that the new RGB kits now offered a so called deblur feature which works by skipping half the pixels. So I thought if this could be implemented with discrete logic.
Turns out I was quite successful with that.
I needed three extra chips to accomplish that and I wanted to upgrade to a monolithic CMOS DAC, so a BT121 triple video DAC was chosen because it comes in a nice PLCC44 package which was easy to work with and the units I received from china were even produced right during the Y2K hype.
I also went to the trouble to implement the 16bit output mode as well (because some people claimed that "some" games look "better" with it but I actually did it because I could).
A 74HC00 quad NAND is used to realize the deblur signals, the first half of the 74HC74 flipflop latches the relation of the HSync to the start of the VSync signal with the help of an RC highpass filter, then the other half latches the output of the first half.
Thanks to the inverted outputs of the 74HC74, 4 diodes and a spare OR gate makes it easy to form a XNOR gate and that's what is needed to detect an interlaced video mode to dynamically disable the deblur mode. Then a 74LVX32 quad OR is used to for the 16bit mode and to mix the deblur signal with the pixelclock.
Now if a game (like Lego Racers for example) were to run in a hi-res non-interlaced 640x240 mode then I need to manually turn the deblur off.
The phase of the deblur is also manually selected, at first I thought that one phase is correct for everything but a few years later I bought a used ED64 v3, then realized that the other deblur phase is needed on a 60hz output. Before that I only had original PAL cartridges only to test with. I could go to the effort to build a scanline counter to detect 50 or 60hz to choose the correct deblur phase but I rather select it manually.
 |
 |
 |
All this was done on a NUS-CPU(P)-01 mainboard. I will publish the schematics when I'm done doing the same to a newer NUS-CPU(P)-02 board.
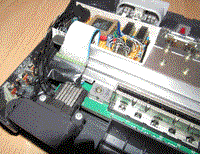
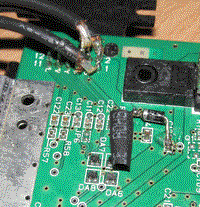
I also connected 12V via a diode and a resistor (for protection) to MultiAV pin 3.
 |
 |
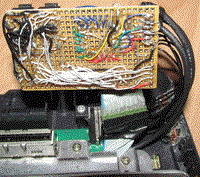
The 74VHC574 on the mainboard is used as an shift register (feed the outputs back to the inputs) to generate 4 separate chip select signals from the /DSYNC input and the 74LVX04 inverts and buffers all these signals to go to the actual board and invert VI_Clock for the shift register.
Also that black thingy on the bottom right is a Si5153 module with an PIC12F629, the pin broke off on the original MX9911 VI_Clock generator when I tried to lift it from the board.
In the past I went to the trouble of removing the DENC-NUS and replacing that with a Sony CXA2075M (converts RGB to CVBS and Y/C) along with a separate PAL crystal oscillator and I had to generate the CSync out of the H- and VSync as well because the PAL alternating logic in the Sony chip didn't liked the internal CSync from the N64.
In the end I reversed all of that nonsense to save space.
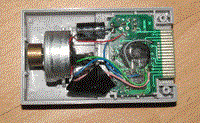
This cheaply produced rumble pak completely runs off the 3.3V rail provided by the controller ports but the circuit design is pretty dumb.
The authentic rumble pak is controlled by an latch that drives the transistor to switch the motor on.
But on this dang thing uses a silly timer (inside the epoxy globtop) runs the motor whenever the address of the latch is written with whatever value.
I modified mine with an actual latch to drive the motor in the same way like the original does.
This works so much better now.
 |
 |